I recently posted about how we use our budget spreadsheet, so I thought I might continue with that theme and talk about how we track and share our itinerary through another spreadsheet.
On our last two trips I have made a spreadsheet to outline our itinerary - check them out on the tools page. While the files you download from our site are Microsoft Excel worksheets, you can easily upload them to Google Drive and have them work with Google Sheets - which we recommend in this case. With Google Sheets, it is much easier to share your spreadsheet with anyone who might be curious about your itinerary, and then they can follow along with your travels!
❕ Tip: This works great for sharing your itinerary with older family members since Google Sheets apps are available for all mobile phones and tablets.
⚠ Note: Be careful with your sharing settings and who you send the link to when doing this - protecting your location is important!
When we went to Europe, the spreadsheet was split up into three columns, because of hopping in and out of the Schengen zone - but this time in Asia, it’s just one long column. Let’s break it down into the two main types of sheets.
The Main Page
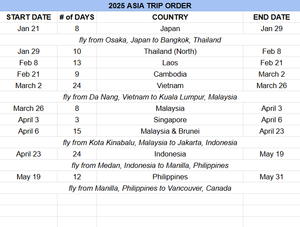
I suggest starting with a main or table of contents style sheet, which lists the arrival and departure dates for each country/state/territory you are going to visit, the name (obviously), and how long you are going to spend there.
❕ Tip: If you want to get fancy with your Excel/Google Sheet skills, you can link the place name on the “Main Sheet” to the “Individual Place” sheets (which we talk about below).
Individual Places

Next, I would make individual sheets for each place, where you can break it down into a day-by-day itinerary. I suggest using the following columns:
- City
- Date
- Number of Days
1would symbolize a whole day in a city0.5would be for spending half a day in one city, and half in another
- Activities
- use this to list any day trips, or your itinerary for the day
- Accommodation
- Transportation
- use this space to show how you are getting from location to location
- when doing a day trip, we use the space to list the train lines or bus routes we need to take
❕ Tip: You can link the start and end dates on the “Individual Place” sheets to the “Main Sheet” if you want to get really fancy.
As we travel, we try to update the planning document ahead of time so our family and friends can see where we are going, and then go back and update the activities column with what we did during the day.
If you want, you can get fancy by adding formulas that will calculate the start and end dates based on how many days you are in a country. When we did the Europe itinerary, this was set up, but for a shorter trip, it is not necessary. The itinerary sheet was also linked to the budgeting sheet, but that is a whole other story…
Let us know how you use the itinerary spreadsheet or the way that you have been planning your trips! Or, if you have any questions or suggestions, we would love to hear them and might incorporate them into our future trips.